Water stains on your ceiling, damp patches on your walls, or a steady drip during a rainstorm all point to one problem: a roof leak. Left alone for even a few weeks, that small drip can rot your roof deck, grow mold in your attic, and cause thousands of dollars in structural damage. The good news is that most roof leaks are fixable without tearing off your entire roof.
This guide walks you through finding the leak source, applying temporary and permanent repairs, and preventing future leaks. Whether you’re dealing with damaged or missing shingles, failed flashing, or a flat roof membrane tear, you’ll know exactly what to do and when to call a professional.
Key Takeaways
- Most roof leaks start small — a cracked shingle, a gap in the flashing, or a dried-out sealant joint. Catching them early saves thousands in repair costs.
- The leak’s entry point is rarely directly above the stain — water travels along rafters and sheathing before dripping down, so tracing the source requires methodical inspection.
- Temporary fixes buy you time, not a solution — tarps and sealant patches stop active water intrusion but must be followed by a permanent repair within days or weeks.
- The five most common leak sources are shingles, flashing, vent boots, valleys, and flat roof seams — knowing which one you’re dealing with determines your repair method.
- Prevention is cheaper than repair — annual inspections, gutter maintenance, and proper attic ventilation eliminate most leak causes before they start.
What Causes a Roof Leak in the First Place?
Quick Answer: Roof leaks most commonly result from damaged shingles, deteriorated flashing around penetrations, cracked vent boots, clogged gutters causing water backup, and age-related material failure. Wind, hail, UV exposure, and ice dams accelerate these problems over time.
Your roof has dozens of potential failure points. Every pipe, chimney, skylight, and valley creates a seam or joint that depends on sealant, flashing, or overlap to stay watertight. When any of those elements fail, water gets in.
Shingle Damage
Asphalt shingles crack, curl, and lose granules as they age. High winds lift shingle tabs, breaking the adhesive seal and exposing the underlayment. Once that underlayment tears or degrades, water reaches the roof deck.
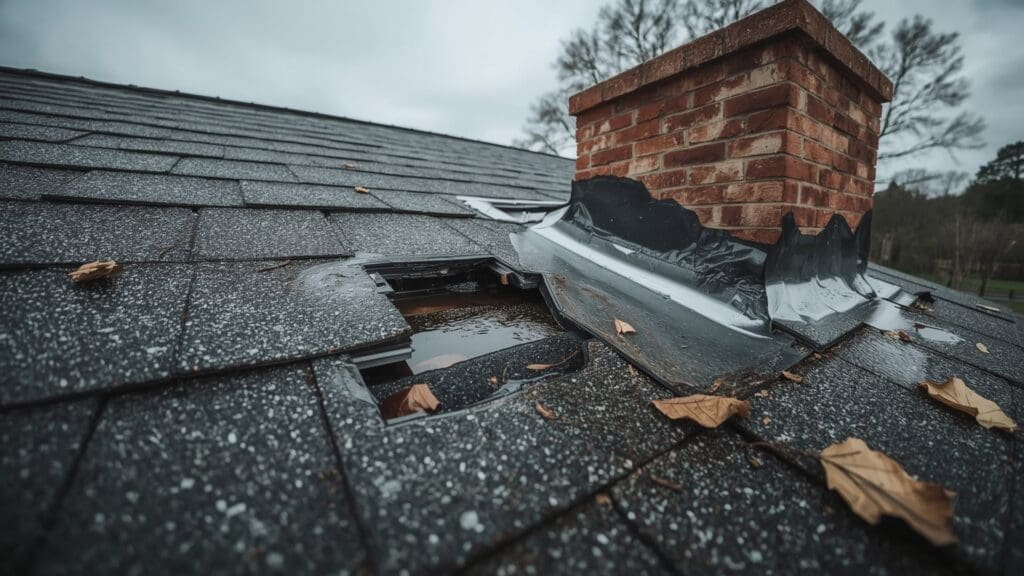
Flashing Failure
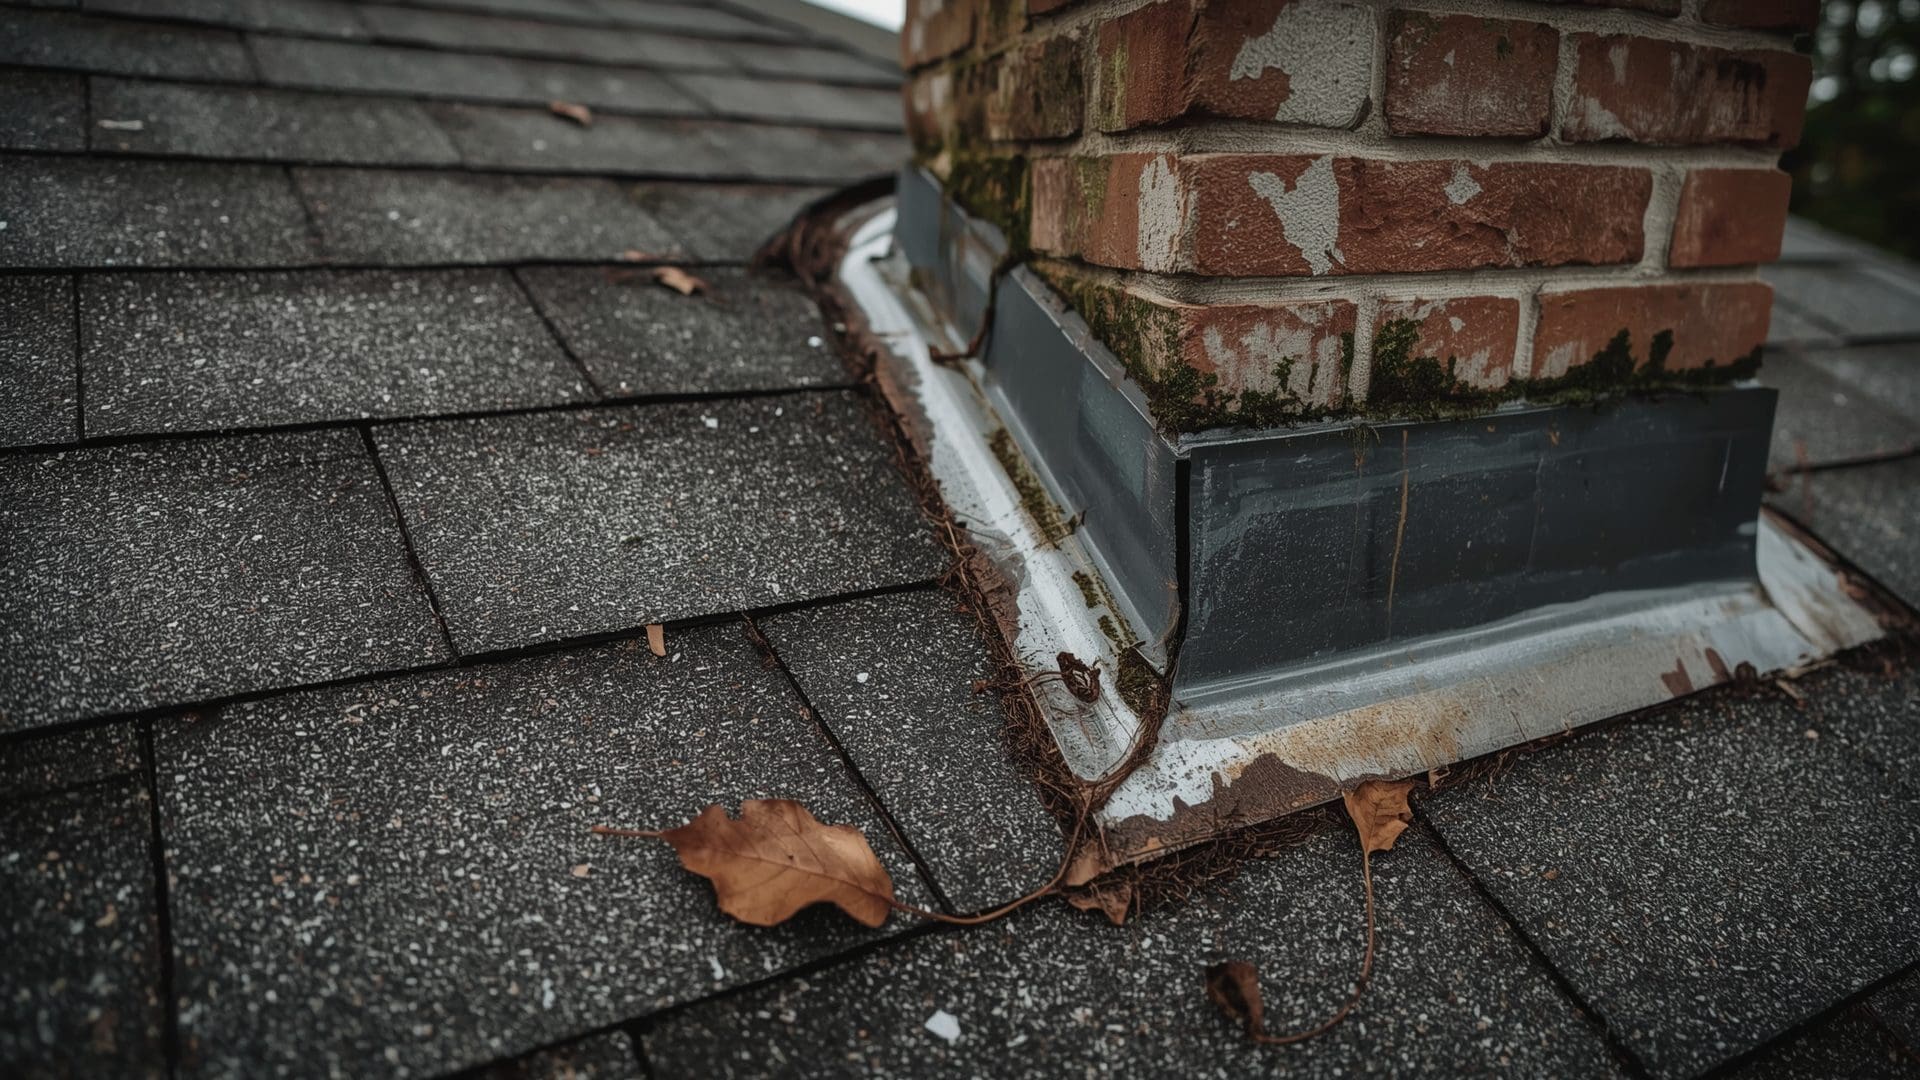
Roof flashing is the thin metal (usually aluminum or galvanized steel) installed where the roof meets a wall, chimney, skylight, or vent pipe. Over time, flashing corrodes, pulls away from the surface, or loses its sealant. Chimney flashing is especially vulnerable because masonry and metal expand at different rates.
Vent Boot Deterioration
Plumbing vents, exhaust fans, and other roof penetrations use rubber or neoprene boots to seal the gap around the pipe. These boots dry out and crack after 10 to 15 years of sun exposure. A cracked boot lets water run straight down the pipe into your home.
Valley Leaks
Roof valleys, where two roof slopes meet, channel large volumes of water. If valley flashing is improperly overlapped or shingles are cut too short, water seeps under the edges. Valleys handle more water per square foot than any other part of your roof.
Ice Dams and Condensation
In cold climates, ice dams form when heat escapes through the roof, melts snow at the ridge, and refreezes at the eaves. The ice blocks drainage, forcing water under the shingles. Condensation leaks happen when warm, moist attic air meets cold roof sheathing, mimicking a traditional leak even without rain.
How Do You Find the Source of a Roof Leak?
Quick Answer: Start from the interior. Locate the water stain, then move into the attic with a flashlight to trace moisture uphill along rafters and sheathing. The entry point is usually several feet higher than the visible stain because water follows gravity along roof structures before dripping down.
Interior Inspection
Look for water stains, bubbling paint, or soft drywall on ceilings and walls. Mark these spots with tape. If you have attic access, go up with a bright flashlight during daylight. Look for wet insulation, dark stains on wood, or daylight peeking through the roof deck.
Water enters the roof at one point but can travel 10 feet or more along a rafter before it drips onto your ceiling. Always trace the moisture trail uphill from where you see it.
Exterior Inspection
From the ground, scan your roof with binoculars for missing shingles, lifted flashing, or visible damage. If you can safely access the roof, walk it methodically. Focus on these high-risk areas:
- Chimney flashing and counter flashing
- Vent pipe boots (look for cracked rubber)
- Roof valleys
- Skylights and their surrounding sealant
- Any area where the roof meets a vertical wall
- Gutter lines (look for pooling or overflow marks)
The Garden Hose Test
If you can’t find the source visually, use a garden hose. Have one person inside the attic while another runs water on the roof, starting at the lowest point and working upward. Isolate one section at a time. When the person inside sees dripping, you’ve found the entry zone. This test requires patience. Run water on each section for at least five minutes before moving on.
What Tools and Materials Do You Need to Fix a Roof Leak?
Quick Answer: Basic roof leak repair requires a pry bar, hammer, roofing nails, roofing cement, a caulk gun, replacement shingles, a utility knife, and a tarp for emergencies. For flashing repairs, add tin snips, sheet metal, and high-quality sealant rated for roofing.
Essential Roof Repair Toolkit
| Tool or Material | Purpose | Approximate Cost |
|---|---|---|
| Flat pry bar | Lifting shingle tabs, removing nails | $8 to $15 |
| Roofing hammer or nail gun | Driving roofing nails | $12 to $25 (hammer) |
| 1.25-inch galvanized roofing nails | Securing shingles and flashing | $5 to $10 per pound |
| Roofing cement (Henry or Black Jack brand) | Sealing shingle edges, flashing joints | $6 to $15 per tube |
| Replacement asphalt shingles (bundle) | Replacing cracked or missing shingles | $30 to $50 per bundle |
| Rubber vent boot (size-matched) | Replacing cracked pipe boots | $10 to $20 each |
| Aluminum step flashing (pack of 10) | Replacing corroded wall flashing | $15 to $25 per pack |
| Polyethylene tarp (10×12 feet minimum) | Emergency temporary cover | $15 to $30 |
| Utility knife with hook blade | Cutting shingles and underlayment | $8 to $12 |
Keep safety gear on this list too: rubber-soled shoes, a roof harness if your pitch exceeds 6/12, and work gloves. Never work on a wet roof.
How Do You Apply a Temporary Emergency Fix During a Storm?
Quick Answer: Cover the leak area with a heavy-duty polyethylene tarp that extends from the ridge down past the leak by at least four feet. Secure the tarp with 2×4 lumber strips and screws, not sandbags alone. This stops active water entry until a permanent repair is possible.
Tarp Installation Steps
- Unroll the tarp so it extends over the roof ridge and at least four feet past the damaged area on all sides.
- Wrap one edge of the tarp around a 2×4 board and screw through the board into the roof deck along the ridge line.
- Stretch the tarp smooth and repeat along the lower edge, screwing through a second 2×4.
- Tuck side edges under shingles if possible, or secure with additional 2×4 strips.
Do not rely on duct tape, bricks, or loose weights. Wind during a storm can rip an unsecured tarp off in seconds, creating a worse problem. The 2×4 anchor method holds in winds up to 40 to 50 mph.
Interior Water Control
While the tarp handles the exterior, manage water inside. Place buckets under active drips. If water is pooling behind a drywall ceiling, poke a small hole with a screwdriver at the lowest point of the bulge to release it into a container. This prevents the ceiling from collapsing under the weight.
How Do You Fix a Roof Leak Caused by Damaged Shingles?
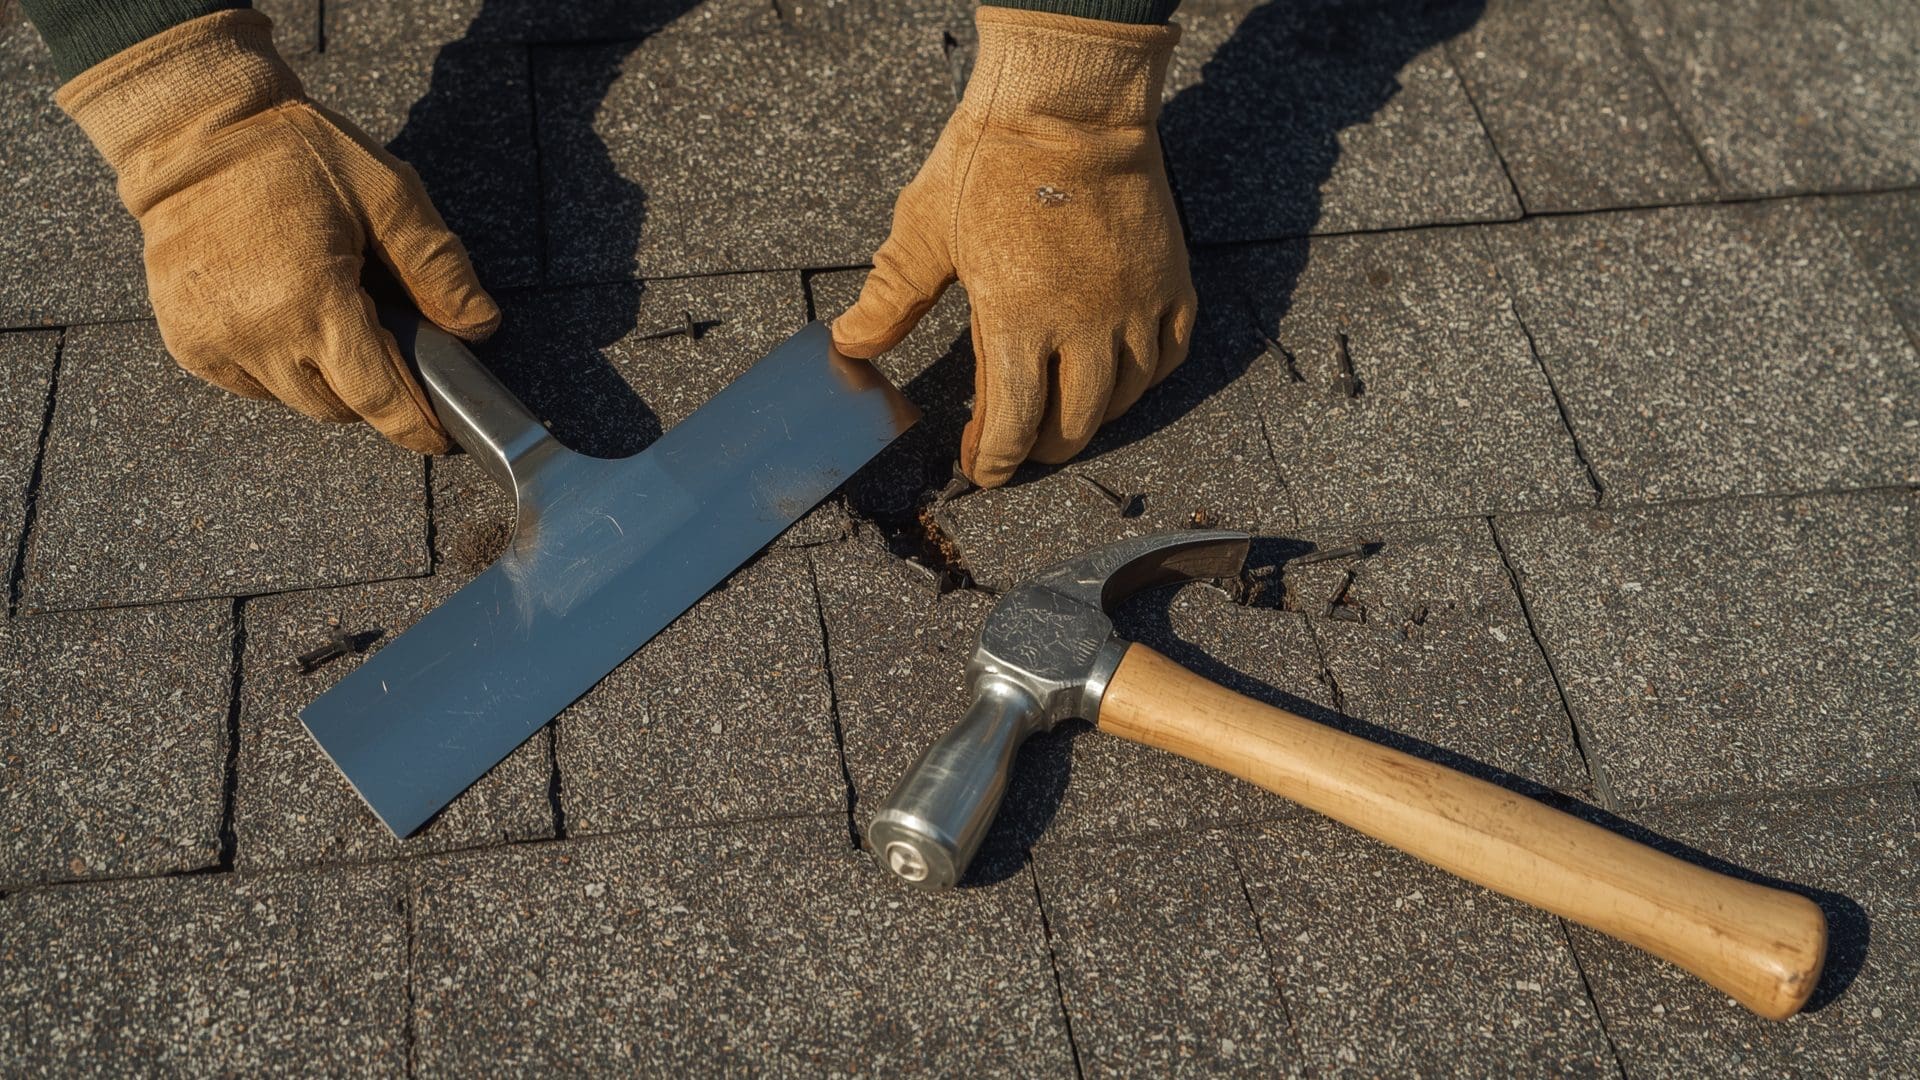
Quick Answer: Lift the tabs of surrounding shingles, remove nails from the damaged shingle with a pry bar, slide it out, and slide a new matching shingle into position. Nail it down with four roofing nails and seal the nail heads and edges with roofing cement.
Step-by-Step Shingle Replacement
- Gently lift the shingle tab directly above the damaged one using a flat pry bar. Be careful in cold weather because shingles become brittle below 40°F.
- Remove the four nails holding the damaged shingle. There are also four nails from the row above that pass through it. Remove those too (typically eight nails total).
- Slide the damaged shingle out.
- Slide the new shingle into position, aligning it with the surrounding shingles.
- Nail the new shingle with four 1.25-inch galvanized roofing nails placed just below the adhesive strip.
- Renail the row above and press the tabs down.
- Apply a quarter-sized dab of roofing cement over each exposed nail head and under any lifted tab edges.
Repairing Cracked but Intact Shingles
If a shingle is cracked but still in place, you don’t always need to replace it. Apply a thick bead of roofing cement under the crack, press the shingle flat, then apply another bead over the top of the crack. Spread it with a putty knife and sprinkle matching granules (scraped from a spare shingle or your gutters) over the cement for UV protection.
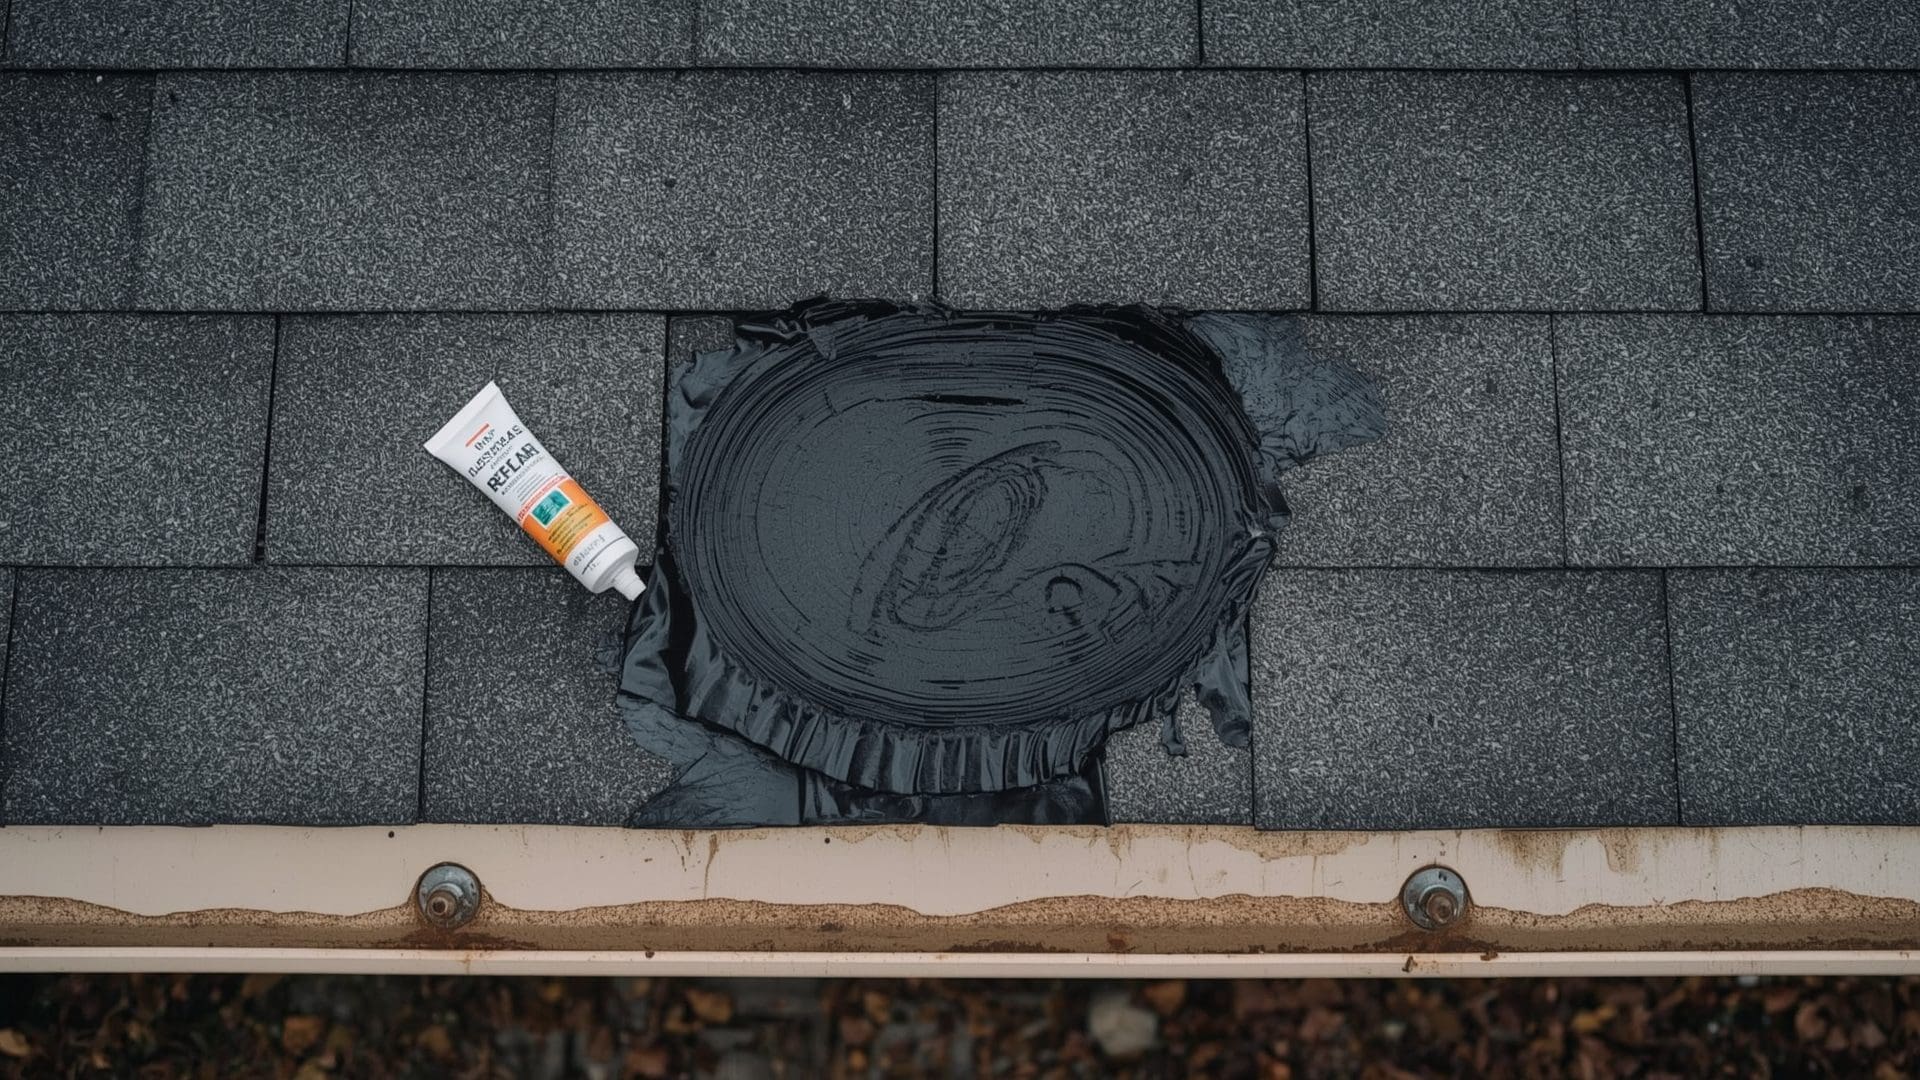
How Do You Repair Leaking Roof Flashing?
Quick Answer: Remove the old sealant with a putty knife, clean the metal surface, and apply new roofing sealant in a continuous bead along all flashing edges. If the flashing itself is corroded or bent, remove the damaged section and install new step or counter flashing with proper overlap.
Chimney Flashing Repair
Chimney leaks are the most common flashing failure. There are two layers: step flashing (L-shaped pieces woven into each shingle course) and counter flashing (embedded in the mortar joints). Here’s how to fix both:
- Remove old caulk and debris from the joint between the counter flashing and the chimney mortar.
- If the counter flashing is still intact, re-seal it. Apply urethane roof sealant (not silicone) into the mortar joint, then press the flashing back in place.
- If step flashing is corroded, lift the shingles above it, pull out the damaged piece, and slide a new piece of aluminum step flashing (typically 5 x 7 inches) under the shingle and up the chimney wall.
- Nail the top edge into the wall sheathing (not the mortar) and cover with counter flashing.
- Seal all overlapping edges with roofing cement.
Wall Flashing and Drip Edge Repair
Where a roof slope meets a sidewall, step flashing should run behind the siding and over each shingle. If water is entering here, the most common fix is pulling back the siding at the lowest three to four courses, checking that step flashing extends at least three inches up the wall, and re-sealing with a moisture barrier tape before re-installing the siding.
How Do You Fix a Leaking Vent Boot?
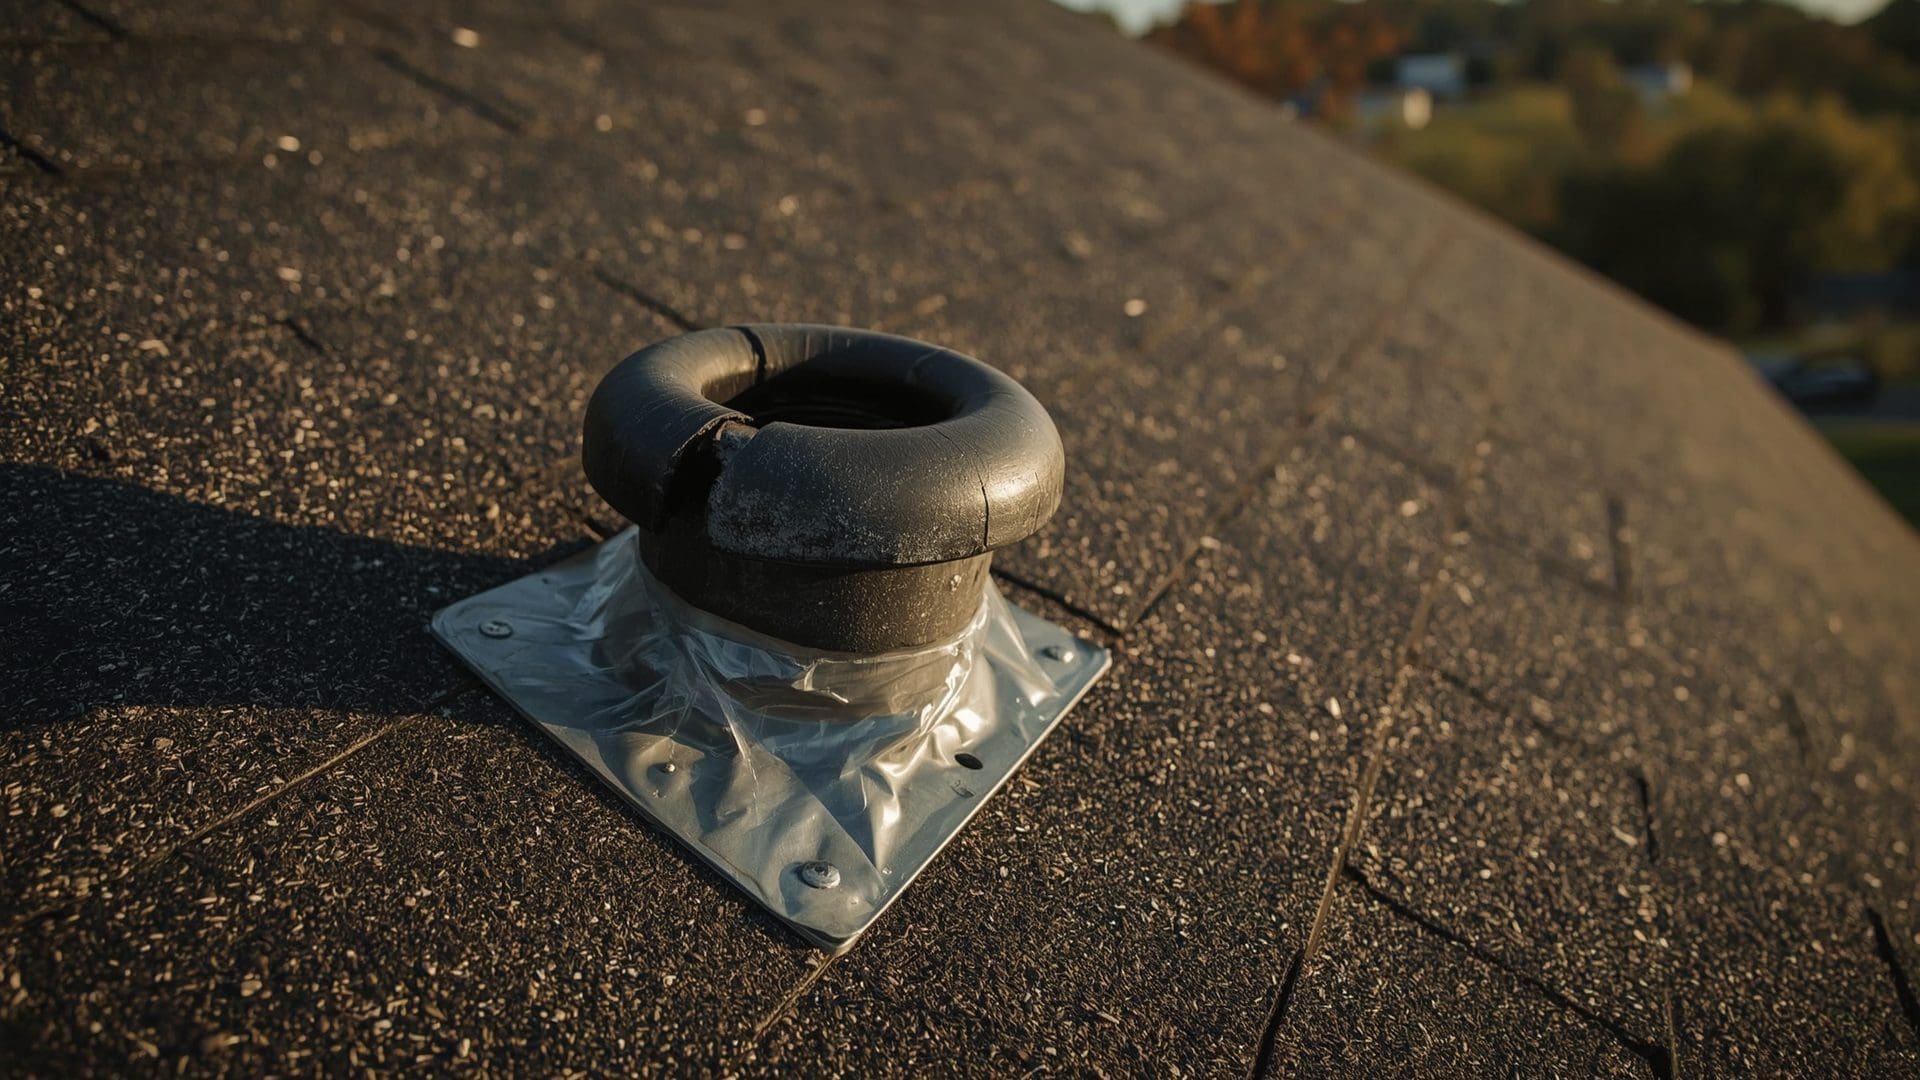
Quick Answer: Remove the shingles overlapping the old boot, pull out the boot, slide a new rubber vent boot over the pipe, re-shingle around it, and seal all edges with roofing cement. A complete boot replacement takes about 30 minutes and costs under $25 in materials.
Vent Boot Replacement Process
- Lift the shingles above and to the sides of the vent pipe. Pry out nails as needed.
- Slide the old boot up and off the pipe.
- Slide the new boot down over the pipe. Make sure the rubber gasket fits snugly around the pipe diameter.
- Tuck the top flange of the boot under the upper shingles. The bottom flange sits on top of the lower shingles.
- Nail the boot flange at the top and sides (never the bottom, so water flows over it).
- Re-lay the shingles over the boot and nail them down.
- Apply roofing cement around the base of the rubber gasket where it meets the pipe for extra protection.
A quick-fix alternative is a vent boot cover that slides over the existing boot without removing shingles. Products like Perma-Boot fit over the old boot and cost around $15. This works well as a fast repair when the boot is cracked but the flange is still sound.
How Do You Fix a Flat Roof Leak?
Quick Answer: Clean the damaged area, apply a peel-and-stick EPDM patch or use a compatible membrane adhesive to bond a patch that extends at least six inches past the damage in all directions. Flat roofs require material-specific patches because EPDM, TPO, and modified bitumen each use different adhesives.
Flat Roof Repair by Material Type
| Roof Material | Patch Method | Adhesive Type | Patch Overlap Required | Cure Time |
|---|---|---|---|---|
| EPDM (rubber) | Peel-and-stick EPDM patch | EPDM bonding adhesive or primer | 6 inches minimum | 24 hours |
| TPO (thermoplastic) | Heat-welded TPO membrane patch | Hot-air weld gun (no adhesive) | 4 to 6 inches | Immediate once cooled |
| Modified bitumen | Torch-applied or peel-and-stick patch | Torch or cold adhesive | 6 inches minimum | 24 to 48 hours |
| Built-up roof (BUR) | Hot mop or cold-applied asphalt patch | Roofing asphalt or cold-process adhesive | 6 to 8 inches | 24 to 72 hours |
EPDM Patch Repair Steps
- Clean the area around the tear with EPDM membrane cleaner. Remove all dirt, debris, and old adhesive.
- Cut a patch from EPDM membrane material that extends at least six inches beyond the damage on all sides. Round the corners to prevent peeling.
- Apply EPDM primer to both the patch and the roof surface. Let it dry until tacky (usually 5 to 10 minutes).
- Press the patch firmly onto the surface, starting from the center and working outward to eliminate air bubbles.
- Roll the entire patch with a seam roller, applying firm pressure to all edges.
- Apply lap sealant around the entire perimeter of the patch.
Addressing Ponding Water
If water pools on your flat roof for more than 48 hours after rain, you have a ponding issue. Standing water accelerates membrane deterioration and adds structural load (about 5.2 pounds per square foot per inch of depth). Fix ponding by installing tapered insulation, adding interior drains, or regrading the surface. Never patch over a ponding area without addressing drainage first.
How Much Does It Cost to Fix a Roof Leak?
Quick Answer: DIY shingle and boot repairs cost $20 to $75 in materials. Professional roof leak repairs average $400 to $1,500 depending on the location, severity, and roof type. Major flashing or structural repairs can reach $2,000 to $3,500 or more.
Roof Leak Repair Cost Breakdown
| Repair Type | DIY Material Cost | Professional Cost (Labor + Materials) | Typical Time to Complete |
|---|---|---|---|
| Single shingle replacement | $10 to $25 | $150 to $400 | 30 to 60 minutes |
| Vent boot replacement | $15 to $25 | $150 to $350 | 30 to 45 minutes |
| Chimney flashing repair | $30 to $75 | $400 to $1,500 | 2 to 4 hours |
| Valley repair | $50 to $100 | $500 to $1,200 | 2 to 3 hours |
| Flat roof patch (EPDM) | $25 to $60 | $300 to $800 | 1 to 2 hours |
| Structural deck repair | $100 to $300 | $1,000 to $3,500 | Half day to full day |
Homeowner’s insurance may cover leak damage from sudden events (like a tree falling or storm damage) but typically does not cover leaks from deferred maintenance or gradual wear. File a claim promptly and document everything with photos before making repairs.
When Should You Call a Professional Roofer Instead of DIY?
Quick Answer: Call a professional when the leak involves structural damage to the roof deck, multiple areas of flashing failure, a steep pitch over 8/12, any work requiring a permit, or if you cannot safely access the damaged area. Also call a pro if a DIY repair hasn’t stopped the leak after one rain cycle.
Signs You Need Professional Help
- Sagging roof deck or visible rot on the sheathing (plywood feels soft or spongy)
- Mold growth covering more than 10 square feet in the attic
- Multiple leak points suggesting systemic failure rather than a single entry point
- Your roof is older than 20 years and hasn’t been inspected professionally
- The leak is near electrical wiring or HVAC equipment
- You’re uncomfortable working at heights or on slopes steeper than 6/12
Choosing a Qualified Roofer
Get at least three written estimates. Verify the contractor is licensed, bonded, and insured in your state. Ask for their manufacturer certification (GAF Master Elite, Owens Corning Platinum, CertainTeed SELECT). These certifications mean the contractor has been trained on specific materials and can offer extended warranties up to 50 years.
Avoid roofers who demand full payment upfront. Industry standard is 10% to 30% deposit, with the balance due upon completion. Get everything in writing including the scope of work, materials specified, timeline, warranty terms, and cleanup responsibilities.
How Do You Prevent Roof Leaks From Happening Again?
Quick Answer: Inspect your roof twice per year (spring and fall), clean gutters every season, trim overhanging branches to 10 feet from the roof surface, maintain proper attic ventilation, and replace deteriorating components proactively. Prevention costs a fraction of emergency repair.
Seasonal Maintenance Checklist
| Task | Frequency | Why It Matters |
|---|---|---|
| Visual roof inspection (binoculars from ground) | Twice per year (spring, fall) | Catches lifted shingles, flashing gaps, and boot cracks before leaks start |
| Gutter and downspout cleaning | 4 times per year | Clogged gutters cause water backup under shingles and fascia rot |
| Trim overhanging tree branches | Annually | Falling branches damage shingles; shade promotes moss and algae growth |
| Check attic for moisture signs | Twice per year | Early detection of condensation leaks and failed ventilation |
| Re-seal exposed flashing and caulk joints | Every 3 to 5 years | Sealant degrades with UV exposure and thermal cycling |
| Professional roof inspection | Every 3 to 5 years | Trained eyes catch issues homeowners miss, especially in hard-to-reach areas |
Attic Ventilation and Insulation
Poor attic ventilation causes two problems: condensation in cold months and excessive heat in summer (which bakes shingles from below). The standard ventilation ratio is 1 square foot of net free ventilation area per 150 square feet of attic floor space. With a balanced system of soffit and ridge vents, that ratio drops to 1:300.
Proper attic ventilation keeps your roof deck dry and extends shingle life by 20% to 30%. Make sure soffit vents aren’t blocked by insulation. Use baffles (cardboard or foam rafter vents) to maintain airflow from soffit to ridge.
Preventing Ice Dams
Ice dams form when your attic is too warm. The fix starts inside, not on the roof. Add insulation to reach R-38 to R-60 (depending on your climate zone). Seal air leaks around recessed lights, plumbing stacks, and attic hatches. If you’ve done both and still get ice dams, heat cables along the eaves and in gutters are a last-resort solution that costs $500 to $1,500 to install professionally.
What Are the Most Common Mistakes When Fixing a Roof Leak?
Quick Answer: The biggest mistakes are applying sealant without finding the true source, using the wrong sealant for the material, nailing through the wrong location, ignoring water damage to the deck underneath, and assuming the first patch solved the problem without testing it through a rain cycle.
Mistake #1: Sealing the Wrong Spot
Because water travels along rafters and sheathing, the stain on your ceiling is almost never directly below the roof entry point. People seal the area above the stain, the leak continues, and they assume the roof needs full replacement. Always trace water from the stain uphill to the true source.
Mistake #2: Using Silicone Caulk on Roofing
Standard silicone caulk doesn’t bond well to asphalt shingles and breaks down under UV exposure faster than roofing-specific products. Use polyurethane or rubberized asphalt sealants labeled specifically for roofing. They stay flexible through freeze-thaw cycles and bond to asphalt, metal, and wood.
Mistake #3: Nailing Through the Waterline
Roofing nails should sit just below the adhesive strip on a shingle, hidden by the tab above. Nails placed too low sit in the water-shedding zone and become leak points themselves. Each exposed nail head is a potential water entry point.
Mistake #4: Ignoring Deck Damage
If the plywood or OSB deck under the shingles is soft, stained, or delaminating, patching over it just traps moisture. Cut out the damaged section of decking and replace it with new plywood of the same thickness (typically 7/16-inch or 1/2-inch OSB) before laying new underlayment and shingles.
Mistake #5: Skipping the Post-Repair Test
After any repair, run a garden hose over the area for at least 10 minutes while someone checks the attic from inside. Don’t assume success. One good rainstorm is the real test. Check the repaired area after the next three rains to confirm the fix is holding.
How Long Does a Roof Leak Repair Last?
Quick Answer: A properly executed shingle or flashing repair lasts 5 to 15 years. A vent boot replacement lasts 10 to 20 years. Flat roof patches last 5 to 10 years. Longevity depends on material quality, installation technique, and ongoing maintenance of the surrounding roof area.
No repair lasts forever, and it won’t outlast the roof around it. If your roof is within five years of its expected lifespan, consider whether a full replacement makes more financial sense than repeated spot repairs. A 20-year-old asphalt shingle roof with multiple leak points is telling you it’s time for a new roof, not more patches.
Frequently Asked Questions
Can I fix a roof leak from inside the attic?
You can apply a temporary interior patch using roofing cement and a piece of plywood pressed against the underside of the deck. This stops the active drip. However, it doesn’t fix the exterior entry point, so water still enters the roof structure. Always follow up with an exterior repair.
Does homeowner’s insurance cover roof leak repair?
Most policies cover sudden and accidental damage, like a tree falling on your roof or damage from a major storm. They typically do not cover leaks caused by wear, aging, or lack of maintenance. Review your policy’s “dwelling coverage” section and file claims within the required timeframe, usually 60 to 90 days.
How fast can a small roof leak cause serious damage?
A small, steady leak can cause visible mold growth within 24 to 48 hours in warm, humid conditions. Within one to two weeks, insulation becomes saturated and loses effectiveness. After a few months, you can see structural wood rot in rafters and decking. Speed matters with any roof leak.
Is Flex Seal a good product for roof leak repair?
Flex Seal works as an ultra-temporary fix for small cracks. It’s not a professional-grade roofing product. It doesn’t bond as durably as polyurethane roof sealant, deteriorates faster in UV exposure, and can make permanent repairs harder because contractors must remove it first. Use proper roofing cement instead.
Can I repair a roof leak in the rain?
You should not attempt permanent repairs on a wet roof. Sealants won’t adhere, shingles become dangerously slippery, and you can’t properly dry and prep the surface. The only safe rainy-day action is applying a tarp from inside the attic or carefully securing one over the roof ridge with 2×4 anchors.
How do I know if I need a roof repair or a full replacement?
If your roof is under 15 years old with one or two isolated leak points, repair makes sense. If your roof is over 20 years old, has multiple leak points, shows widespread granule loss, or has a sagging deck, a full replacement is more cost-effective. A professional inspection gives you a clear recommendation based on remaining useful life.